This article was originally published at https://cloud.redhat.com/experts/aro/private-cluster/
A Quickstart guide to deploying a Private Azure Red Hat OpenShift cluster.
Prerequisites
Azure CLI
Obviously you’ll need to have an Azure account to configure the CLI against.
MacOS
See Azure Docs for alternative install options.
1. Install Azure CLI using homebrew
brew update && brew install azure-cli
2. Install sshuttle using homebrew
brew install sshuttleLinux
See Azure Docs for alternative install options.
1. Import the Microsoft Keys
sudo rpm --import https://packages.microsoft.com/keys/microsoft.asc2. Add the Microsoft Yum Repository
cat << EOF | sudo tee /etc/yum.repos.d/azure-cli.repo
[azure-cli]
name=Azure CLI
baseurl=https://packages.microsoft.com/yumrepos/azure-cli
enabled=1
gpgcheck=1
gpgkey=https://packages.microsoft.com/keys/microsoft.asc
EOF
3. Install Azure CLI
sudo dnf install -y azure-cli sshuttlePrepare Azure Account for Azure OpenShift
1. Log into the Azure CLI by running the following and then authorizing through your Web Browser
az login2. Make sure you have enough Quota (change the location if you’re not using East US)
az vm list-usage --location "East US" -o table
See Addendum – Adding Quota to ARO account if you have less than 36 Quota left for Total Regional CPUs
3. Register resource providers
az provider register -n Microsoft.RedHatOpenShift --wait
az provider register -n Microsoft.Compute --wait
az provider register -n Microsoft.Storage --wait
az provider register -n Microsoft.Authorization --wait
Get Red Hat pull secret
- Log into cloud.redhat.com
- Browse to https://cloud.redhat.com/openshift/install/azure/aro-provisioned
- click the Download pull secret button and remember where you saved it, you’ll reference it later.
Deploy Azure OpenShift
Variables and Resource Group
Set some environment variables to use later, and create an Azure Resource Group.
1. Set the following environment variables
Change the values to suit your environment, but these defaults should work.
export AZR_RESOURCE_LOCATION=eastus
export AZR_RESOURCE_GROUP=openshift-private
export AZR_CLUSTER=private-cluster
export AZR_PULL_SECRET=~/Downloads/pull-secret.txt
export NETWORK_SUBNET=10.0.0.0/20
export CONTROL_SUBNET=10.0.0.0/24
export MACHINE_SUBNET=10.0.1.0/24
export FIREWALL_SUBNET=10.0.2.0/24
export JUMPHOST_SUBNET=10.0.3.0/24
2. Create an Azure resource group
az group create                \
  --name $AZR_RESOURCE_GROUP   \
  --location $AZR_RESOURCE_LOCATION
3. Create an Azure Service Principal
AZ_SUB_ID=$(az account show --query id -o tsv)
AZ_SP_PASS=$(az ad sp create-for-rbac -n "${AZR_CLUSTER}-SP" --role contributor \
  --scopes "/subscriptions/${AZ_SUB_ID}/resourceGroups/${AZR_RESOURCE_GROUP}" \
  --query "password" -o tsv)
AZ_SP_ID=$(az ad sp list --display-name "${AZR_CLUSTER}-SP" --query "[0].appId" -o tsv)
Networking
Create a virtual network with two empty subnets
1. Create virtual network
az network vnet create                                    \
  --address-prefixes $NETWORK_SUBNET                      \
  --name "$AZR_CLUSTER-aro-vnet-$AZR_RESOURCE_LOCATION"   \
  --resource-group $AZR_RESOURCE_GROUP
2. Create control plane subnet
az network vnet subnet create                                     \
  --resource-group $AZR_RESOURCE_GROUP                            \
  --vnet-name "$AZR_CLUSTER-aro-vnet-$AZR_RESOURCE_LOCATION"      \
  --name "$AZR_CLUSTER-aro-control-subnet-$AZR_RESOURCE_LOCATION" \
  --address-prefixes $CONTROL_SUBNET
3. Create machine subnet
az network vnet subnet create                                       \
  --resource-group $AZR_RESOURCE_GROUP                              \
  --vnet-name "$AZR_CLUSTER-aro-vnet-$AZR_RESOURCE_LOCATION"        \
  --name "$AZR_CLUSTER-aro-machine-subnet-$AZR_RESOURCE_LOCATION"   \
  --address-prefixes $MACHINE_SUBNET
4. Disable network policies for Private Link Service on the control plane subnet
Optional. The ARO RP will disable this for you if you skip this step
az network vnet subnet update                                       \
  --name "$AZR_CLUSTER-aro-control-subnet-$AZR_RESOURCE_LOCATION"   \
  --resource-group $AZR_RESOURCE_GROUP                              \
  --vnet-name "$AZR_CLUSTER-aro-vnet-$AZR_RESOURCE_LOCATION"        \
  --disable-private-link-service-network-policies true
Egress
Public and Private clusters will have --outbound-type defined to LoadBalancer by default. It means all clusters by default have open egress to the internet through the public load balancer.
To change the default behavior and restrict the Internet Egress you have to set --outbound-type to UserDefinedRouting during cluster creation, and set up a traffic to run through a Firewall solution. This can either be a 3rd party solution or a native Azure solution such as Azure Firewall/Azure NAT Gateway.
If you want to proceed with the UserDefinedRouting the two examples below show how this can be achieved through either Azure NAT gateway or Azure Firewall + Internet Egress.
1a. NAT Gateway
You can skip this step if you don’t need to restrict egress.
This option replaces the routes for the cluster to go through the Azure NAT GW service for egress vs the LoadBalancer. This will incur extra Azure costs.
1. Create a Public IP
az network public-ip create -g $AZR_RESOURCE_GROUP \
  -n $AZR_CLUSTER-natgw-ip   \
  --sku "Standard" --location $AZR_RESOURCE_LOCATION
2. Create the NAT Gateway
az network nat gateway create \
  --resource-group ${AZR_RESOURCE_GROUP} \
  --name "${AZR_CLUSTER}-natgw" \
  --location ${AZR_RESOURCE_LOCATION} \
  --public-ip-addresses "${AZR_CLUSTER}-natgw-ip"
3. Get the Public IP of the NAT Gateway
GW_PUBLIC_IP=$(az network public-ip show -g ${AZR_RESOURCE_GROUP} \
  -n "${AZR_CLUSTER}-natgw-ip" --query "ipAddress" -o tsv)

echo $GW_PUBLIC_IP
4. Reconfigure Subnets to use Nat GW
az network vnet subnet update \
  --name "${AZR_CLUSTER}-aro-control-subnet-${AZR_RESOURCE_LOCATION}"   \
  --resource-group ${AZR_RESOURCE_GROUP}                              \
  --vnet-name "${AZR_CLUSTER}-aro-vnet-${AZR_RESOURCE_LOCATION}"        \
--nat-gateway "${AZR_CLUSTER}-natgw"az network vnet subnet update \
--name "${AZR_CLUSTER}-aro-machine-subnet-${AZR_RESOURCE_LOCATION}" \
--resource-group ${AZR_RESOURCE_GROUP} \
--vnet-name "${AZR_CLUSTER}-aro-vnet-${AZR_RESOURCE_LOCATION}" \
--nat-gateway "${AZR_CLUSTER}-natgw"1b. Firewall + Internet Egress
This option replaces the routes for the cluster to go through Azure Firewall for egress traffic, rather than the LoadBalancer. This will incur extra Azure costs.
You can skip this step if you don’t need to restrict egress
1. Make sure you have the AZ CLI firewall extensions
az extension add -n azure-firewall
az extension update -n azure-firewall
2. Create a firewall network, IP, and firewall
az network vnet subnet create                                 \
  -g $AZR_RESOURCE_GROUP                                      \
  --vnet-name "$AZR_CLUSTER-aro-vnet-$AZR_RESOURCE_LOCATION"  \
  -n "AzureFirewallSubnet"                                    \
  --address-prefixes $FIREWALL_SUBNET

az network public-ip create -g $AZR_RESOURCE_GROUP -n fw-ip   \
  --sku "Standard" --location $AZR_RESOURCE_LOCATION

az network firewall create -g $AZR_RESOURCE_GROUP             \
  -n aro-private -l $AZR_RESOURCE_LOCATION
3. Configure the firewall and configure IP Config (this may take 15 minutes)
az network firewall ip-config create -g $AZR_RESOURCE_GROUP    \
  -f aro-private -n fw-config --public-ip-address fw-ip        \
  --vnet-name "$AZR_CLUSTER-aro-vnet-$AZR_RESOURCE_LOCATION"

FWPUBLIC_IP=$(az network public-ip show -g $AZR_RESOURCE_GROUP -n fw-ip --query "ipAddress" -o tsv)
FWPRIVATE_IP=$(az network firewall show -g $AZR_RESOURCE_GROUP -n aro-private --query "ipConfigurations[0].privateIPAddress" -o tsv)

echo $FWPUBLIC_IP
echo $FWPRIVATE_IP
4. Create and configure a route table
az network route-table create -g $AZR_RESOURCE_GROUP --name aro-udr

sleep 10

az network route-table route create -g $AZR_RESOURCE_GROUP --name aro-udr \
  --route-table-name aro-udr --address-prefix 0.0.0.0/0                   \
  --next-hop-type VirtualAppliance --next-hop-ip-address $FWPRIVATE_IP

az network route-table route create -g $AZR_RESOURCE_GROUP --name aro-vnet   \
  --route-table-name aro-udr --address-prefix 10.0.0.0/16 --name local-route \
  --next-hop-type VirtualNetworkGateway
5. Create firewall rules for ARO resources
Note: ARO clusters do not need access to the internet, however your own workloads running on them may. You can skip this step if you don’t need any egress at all.
- Create a Network Rule to allow all http/https egress traffic (not recommended)
az network firewall network-rule create -g $AZR_RESOURCE_GROUP -f aro-private \
    --collection-name 'allow-https' --name allow-all                          \
    --action allow --priority 100                                             \
    --source-addresses '*' --dest-addr '*'                                    \
--protocols 'Any' --destination-ports 1-65535- Create Application Rules to allow to a restricted set of destinations (replace the target-fqdns with your desired destinations)
az network firewall application-rule create -g $AZR_RESOURCE_GROUP -f aro-private     \
    --collection-name 'Allow_Egress'                                                  \
    --action allow                                                                    \
    --priority 100                                                                    \
    -n 'required'                                                                     \
    --source-addresses '*'                                                            \
    --protocols 'http=80' 'https=443'                                                 \
    --target-fqdns '*.google.com' '*.bing.com'

az network firewall application-rule create -g $AZR_RESOURCE_GROUP -f aro-private     \
    --collection-name 'Docker'                                                        \
    --action allow                                                                    \
    --priority 200                                                                    \
    -n 'docker'                                                                       \
    --source-addresses '*'                                                            \
    --protocols 'http=80' 'https=443'                                                 \
    --target-fqdns '*cloudflare.docker.com' '*registry-1.docker.io' 'apt.dockerproject.org' 'auth.docker.io'
6. Update the subnets to use the Firewall
Once the cluster is deployed successfully you can update the subnets to use the firewall instead of the default outbound loadbalancer rule.
az network vnet subnet update -g $AZR_RESOURCE_GROUP            \
--vnet-name $AZR_CLUSTER-aro-vnet-$AZR_RESOURCE_LOCATION        \
--name "$AZR_CLUSTER-aro-control-subnet-$AZR_RESOURCE_LOCATION" \
--route-table aro-udr

az network vnet subnet update -g $AZR_RESOURCE_GROUP            \
--vnet-name $AZR_CLUSTER-aro-vnet-$AZR_RESOURCE_LOCATION        \
--name "$AZR_CLUSTER-aro-machine-subnet-$AZR_RESOURCE_LOCATION" \
--route-table aro-udr
Create the cluster
This will take between 30 and 45 minutes.
az aro create                                                            \
--resource-group $AZR_RESOURCE_GROUP                                     \
--name $AZR_CLUSTER                                                      \
--vnet "$AZR_CLUSTER-aro-vnet-$AZR_RESOURCE_LOCATION"                    \
--master-subnet "$AZR_CLUSTER-aro-control-subnet-$AZR_RESOURCE_LOCATION" \
--worker-subnet "$AZR_CLUSTER-aro-machine-subnet-$AZR_RESOURCE_LOCATION" \
--apiserver-visibility Private                                           \
--ingress-visibility Private                                             \
--pull-secret @$AZR_PULL_SECRET                                          \
--client-id "${AZ_SP_ID}"                                                \
--client-secret "${AZ_SP_PASS}"
Be sure to add the --outbound-type UserDefinedRouting flag if you are not using the default routing.
Jump Host
With the cluster in a private network, we can create a Jump host in order to connect to it. You can do this while the cluster is being created.
1. Create jump subnet
az network vnet subnet create                                \
  --resource-group $AZR_RESOURCE_GROUP                       \
  --vnet-name "$AZR_CLUSTER-aro-vnet-$AZR_RESOURCE_LOCATION" \
  --name JumpSubnet                                          \
  --address-prefixes $JUMPHOST_SUBNET                        \
  --service-endpoints Microsoft.ContainerRegistry
2. Create a jump host
az vm create --name jumphost                 \
    --resource-group $AZR_RESOURCE_GROUP     \
    --ssh-key-values $HOME/.ssh/id_rsa.pub   \
    --admin-username aro                     \
    --image "RedHat:RHEL:9_1:9.1.2022112113" \
    --subnet JumpSubnet                      \
    --public-ip-address jumphost-ip          \
    --public-ip-sku Standard                 \
    --vnet-name "$AZR_CLUSTER-aro-vnet-$AZR_RESOURCE_LOCATION"
3. Save the jump host public IP address
JUMP_IP=$(az vm list-ip-addresses -g $AZR_RESOURCE_GROUP -n jumphost -o tsv \
--query '[].virtualMachine.network.publicIpAddresses[0].ipAddress')
echo $JUMP_IP
4. Use sshuttle to create a ssh vpn via the jump host (use a separate terminal session) – replace the IP with the IP of the jump box from the previous step
sshuttle --dns -NHr "aro@${JUMP_IP}" $NETWORK_SUBNET5. Get OpenShift console URL
Set these variables to match the ones you set at the start.
APISERVER=$(az aro show              \
--name $AZR_CLUSTER                  \
--resource-group $AZR_RESOURCE_GROUP \
-o tsv --query apiserverProfile.url)
echo $APISERVER
6. Get OpenShift credentials
ADMINPW=$(az aro list-credentials    \
--name $AZR_CLUSTER                  \
--resource-group $AZR_RESOURCE_GROUP \
--query kubeadminPassword            \
-o tsv)
7. log into OpenShift
oc login $APISERVER --username kubeadmin --password ${ADMINPW}Delete Cluster
Once you’re done its a good idea to delete the cluster to ensure that you don’t get a surprise bill.
1. Delete the cluster
az aro delete -y                       \
  --resource-group $AZR_RESOURCE_GROUP \
  --name $AZR_CLUSTER
2. Delete the Azure resource group
Only do this if there’s nothing else in the resource group.
az group delete -y \
  --name $AZR_RESOURCE_GROUP
Addendum
Adding Quota to ARO account
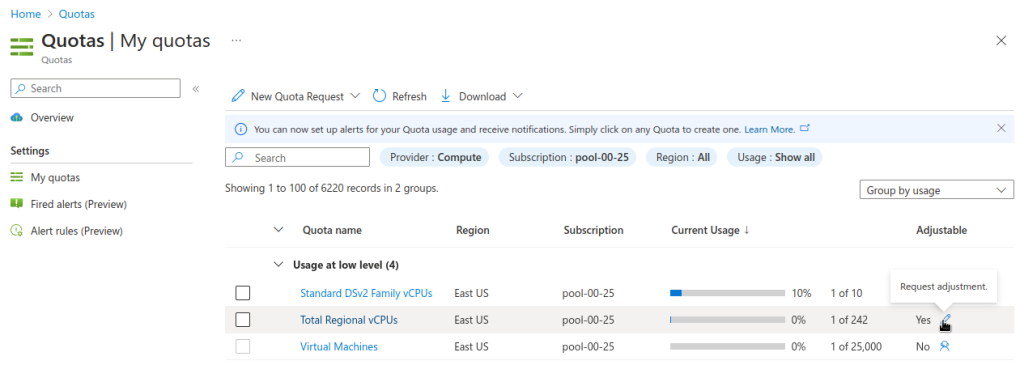
1. Visit My Quotas in the Azure Console
2. Choose the appropriate filters:
- Set Provider to “Compute”
- Set Subscription to the subscription you are creating the cluster in
- Set Region to “East US” and uncheck the other region boxes
3. Search for the quota name that you want to increase. This may be “Total Regional vCPUs” if you checked that prior to creating the cluster, or it may be a specific resource quota named in a ResourceQuotaExceeded error message. Note that in the latter case, the Azure console uses a localized display name (for example Standard DSv3 Family vCPUs rather than an identifier name standardDSv3Family mentioned in the error message.
4. Next to the quota name you wish to increase, click the pencil in the Adjustable column to request adjustment
5. Enter the new desired quota in the New limit text box. By default, a cluster will need 36 additional Regional vCPUs beyond current usage, or the ResourceQuotaExceeded error message will tell you how much more of an additional resource is needed.
6. Click Submit. You may need to go through additional authentication.
7. Azure will review your request to adjust your quota. This may take several minutes.
Leave a Reply